How to get to settings
From a desktop
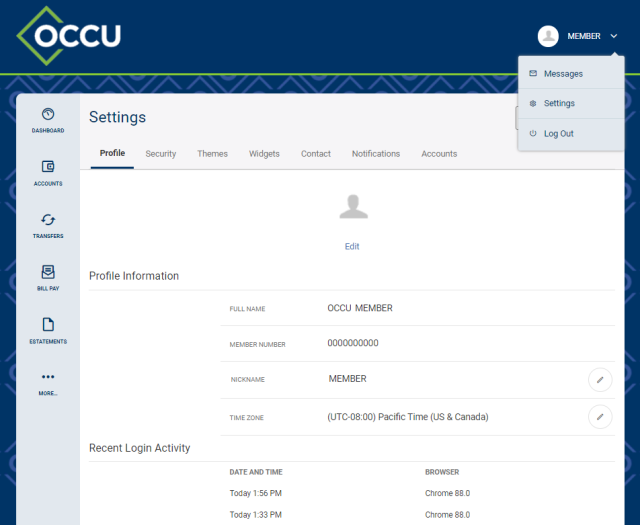
Navigate to Settings on desktop by clicking your name in the top-right corner of the screen and choosing Settings from the menu.
From the app
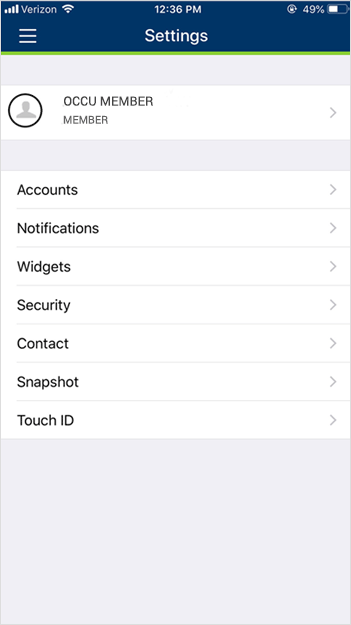
From the MyOCCU Mobile app, tap the menu icon to locate Settings. Only nickname can be edited from the Profile section in the app.
Customize your dashboard on MyOCCU Online
With the new MyOCCU Online dashboard, you’ll see your accounts, announcements, alerts and educational content all in one place. You can customize each section to fit your needs.
Profile
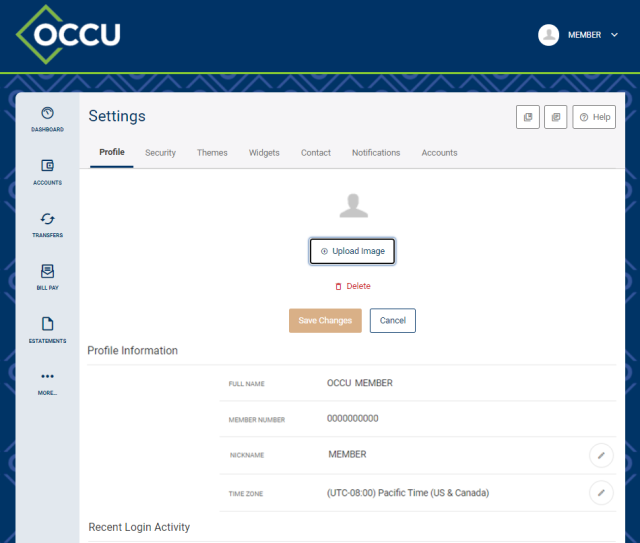
From the profile settings tab, you can upload a profile picture, edit your profile nickname (the text next to your profile picture), change your time zone and view recent login activity. Learn how to add a profile picture below.
-
Add a profile picture
In the Profile tab, add a photo with the Edit button under the profile photo.
Security
From the security settings tab, you can edit your username and password, enable two-factor authentication methods, manage your security questions and view/manage remembered devices. Two-factor authentication allows for one-time codes to be sent to your device of choice via SMS to verify your identity at login.
Widgets
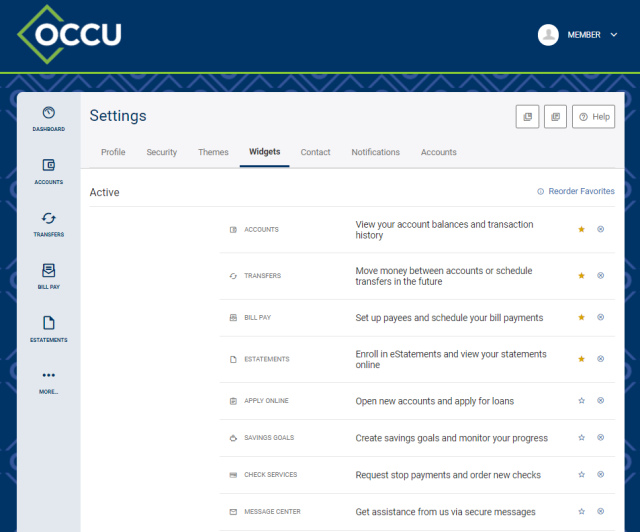
From the Widgets tab, you can select up to five favorite menu options and reorder them any way you’d like. When you favorite a widget, it will appear in the left menu panel. Items not favorited can be accessed from the More… icon in the menu panel.
-
Choose your favorite menu items
Choose the Widgets tab under Settings. Use the star icon next to any widget to mark as a favorite. Once selected, a star will turn gold to signify it is a favorite. To remove a favorite, simply choose the gold star and it will turn back to white.
-
Reorder your favorite menu items
Use the Reorder Favorites link above the active widget list to display the reorder icons. Click and drag the favorited widget into a new location. Use the Save button to save your changes.
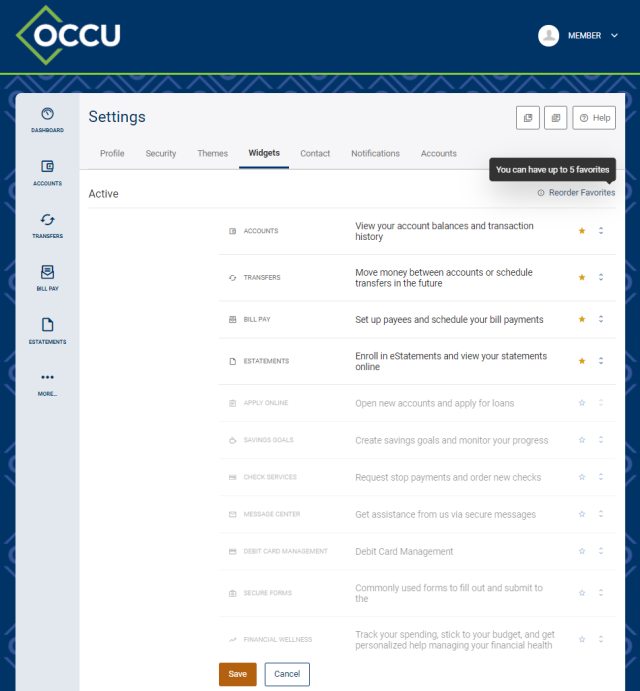
If you wish to remove a widget from your view within MyOCCU Online & Mobile, use the x icon to move the widget to the Available section and out of your site navigation. To activate an available widget, simply use the + Add button.
From the MyOCCU Mobile app, tap the menu icon to locate Settings. You can edit your favorites and reorder items from the Widgets section in the app.
Contact
From the Contact tab, you can update your contact information including physical address, phone numbers and email addresses. You can also enable SMS text messaging to your mobile devices to receive account notification alerts.
Enable SMS messaging
-
Navigate
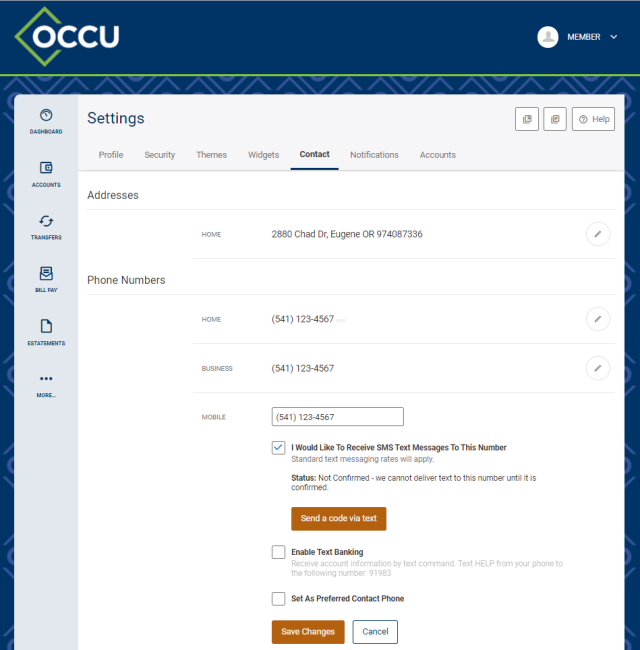
Choose the Contact tab under Settings. Locate or add the phone number you would like to enable and choose the pencil icon to display additional options.
-
Select
Check the box I would like to receive SMS text messages to this number.
-
Verify
Use the Send a code via text button and follow the prompts to verify your identity. Enter the one-time security code sent to your phone number in the prompt box. You will be sent a second verification code. Enter that code into the second box.
-
Save
Use the Save Changes button to finish the process.
From the MyOCCU Mobile app, tap the menu icon to locate Settings. Under the Contact section, you can update address, phone number and email. You can also enable SMS text messaging to your mobile device.
Notifications
From the Notifications settings tab, you can set alerts for events related to your accounts. Events include general alerts, accounts, transfers, savings goals and security notifications. To learn more, read Manage your account notification alerts article.
From the MyOCCU Mobile app, tap the menu icon to locate Settings. Under the Notifications section in the mobile app you can only edit the notification delivery options you have previously set up from your desktop. You can enable push notifications from your mobile device.
Accounts
From the accounts settings tab, you can adjust the way accounts are displayed throughout MyOCCU Online & Mobile as well as hide accounts from view and link external accounts.
Edit account details
Use the pencil icon to activate the Edit Account Details screen and to update information such as account nickname, color or order. To learn more, read the Monitor your account activity article.
Hide or unhide accounts from view
Please note by choosing to hide an account from the accounts tab under settings, you will not be able to see or perform any activity related to the account. If you would like to simply hide an account from view on your dashboard, please navigate to the dashboard and use the gear icon above accounts to make additional customizations.
-
Navigate
Choose the Accounts tab under Settings.
-
Edit
Use the pencil icon next to the account you would like to hide, unhide or edit. Edit the account Nickname or Account Color or check or uncheck the Hide this account box.
-
Save
Save your selections.
From the MyOCCU Mobile app, tap the menu icon to locate Settings. Under the Use Snapshot section in the mobile app you can enable snapshot. Snapshot allows you to quickly peek at your account balances without logging into your mobile app. Simply choose the accounts you would like to enable and save your selections. For more details, read the MyOCCU Mobile App article.
For more information on how to set up and edit external accounts, read the Transfer funds with MyOCCU Online & Mobile article.
Link external accounts
From the accounts settings tab, you can link accounts from another financial institution and add external transfer accounts.
Linking your accounts from other financial institutions allows you to view the balances and transactions of those accounts within MyOCCU Online & Mobile. Adding an external transfer account allows you to make transfers to and from an external account.
Learn more about the two options below.
Link an account from another financial institution
To aggregate all your financial accounts into one location, simply follow the steps below to link accounts and begin monitoring all your financial data in one place, including balances and transactions. To learn more about this feature, read the link your financial accounts article.
-
Navigate
Choose the Accounts tab under Settings.
-
Open
Use the +Link an External Account link to open the Add an external account screen.
-
Select
Select the option Link accounts from another financial institution from the list.
-
Search
Use the search function or the list of popular sites to locate the institution you would like to link to.
-
Provide credentials
You will be prompted to provide your login credentials for the selected financial institution.
Add an external transfer account
You can also make transfers to and from external accounts at other financial institutions by adding them to your online banking as external transfer accounts. Follow the steps below to configure external transfer accounts from Settings. For more information on how to set up and edit external transfer accounts, read the Transfer funds with MyOCCU Online & Mobile article.
-
Navigate
Choose the Accounts tab under Settings.
-
Open
Use the +Link an External Account link to open the Add an external account screen.
-
Select
Select the option External transfer account from the list.
-
Agree
Check I Agree to confirm that you understand and agree to OCCU’s ACH Transfer Policy, then choose Continue.
-
Add information
Fill out the following information about your external account:
- Account type (checking or savings).
- Routing number.
- Account number.
- A nickname that will be used for future transfers.
-
Monitor
Monitor the external account for two micro-transactions. You’ll see a message on your dashboard prompting you to enter the amounts of these transactions until you confirm.
Once you’ve confirmed the external account, it will be available in both the Quick and Classic transfer tabs to move money in and out of easily. You can also add external accounts by navigating to Settings and choosing the Accounts tab. Learn more in the Get to Know MyOCCU Online & Mobile article.
